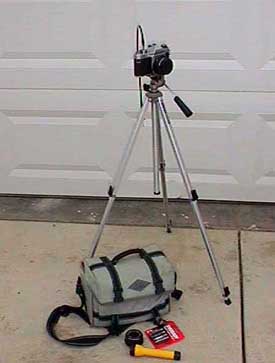
 The Camera:
There are three things you must have for night photography. The first thing is
that your camera must have a "B" setting or manual time exposure setting. This
is necessary to be able to take the long exposures needed for capturing images
at night.
The second thing you must have is a tripod to mount the camera on. It is
impossible to hold a camera in your hand and keep it steady enough to be able to
take time exposures without blurring, so don't even try. The tripod does not
need to be fancy, as long as it is stable. You can even build a simple one yourself.
The third essential item you need is a cable release to operate your camera's
shutter. Once again, no one can hold down the shutter button with their finger for
several seconds without jiggling the camera a little. Even the slightest vibrations
will blur your photo.
If your camera has these three essential items, your are ready to begin
shooting photos at night.
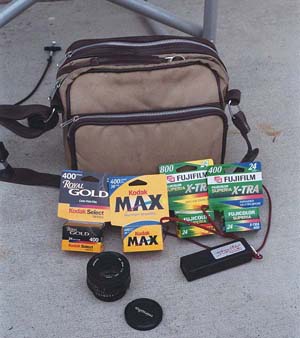 Film:
Film:
Today's photographers have a much better choice of films for night use than
ever before. There is no need for any special films or processes to capture some
great shots of the night sky. We have tried many different films, and fortunately
have found some of our favorites to be the most common and widely available.
Film is now available in much faster speeds and finer grains than it was just a
few years ago. It also has a much larger range of exposure times that will yield
good results, making night photography something anyone can do.
For Aurora, try Kodak Max 400, Kodak Royal Gold 400, Fuji Superia or Super
HG, 400 or 800 speed. Fuji 1600 is also good for capturing fast moving auroras
and finer detail in shorter exposures.
 Star Fields and
Constellations:
One of the first things you may want to try photographing is Constellations or the
stars of the Milky Way. Be sure your camera is set to the "B" setting and set the
lens to it's lowest F stop number. This opens the lens all the way and lets it the in
the maximum amount of light. Most 28 to 50mm lenses have an F number of 1.7 to
2.8 for their fastest setting.
When you have the area you want to photograph centered, focus your camera on
a star to where it appears the smallest and sharpest. You can shoot up to 30
second exposures with a 50mm lens before stars will start to show trails due to
the Earths rotation. Be sure not to jiggle the tripod or camera during the exposure or
your photo will blur and all your stars will be doubles.
Use a fast film like Fuji 800 or 1600 or try Konica 3200 if you can find it. It is
amazingly fast but is somewhat grainy. This photo of Cygnus setting in the Arizona
desert was shot on Fuji 1600 speed with a 30 second exposure using a 50mm lens
at F 1.7
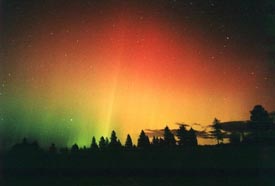
The best advise for shooting aurora is to "bracket" your photos,
meaning shoot
photos at several different exposure lengths. Most of our auroras
are shot on 400 or
800 speed film with exposures of 15 to 30 seconds. Try shooting
several in a row and
vary the exposures by about 5 seconds. This will give you a good
chance of capturing
a perfect one. Try to get a little horizon, or silhouette of a tree
or building against the
sky. This will give your photo some frame of reference for size and
distance. The
camera will capture colors that your eye can barely
see and even faint aurora yield
surprising results. This photo was shot on Fuji 800 film with a 28mm
lens at F 2.8 with
a
20 second long exposure.
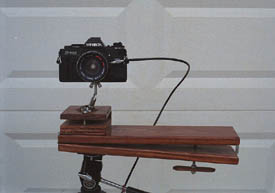
You can take
longer exposures of several minutes by building
your own
tracking
platform. The platform is hinged on one end and has a threaded bolt
at a given distance
away. The hinge is aligned to point at the celestial pole. The
threaded bolt is turned at
1 rpm by hand and causes the upper half of the platform to rotate
in the same direction
and at the same rate as the Earth. A well aligned platform and a
steady hand can let
you take photos with up to 20 minute exposures. Be sure to take
notes on what you
do. It is very helpful later on unless your memory is photographic
too.
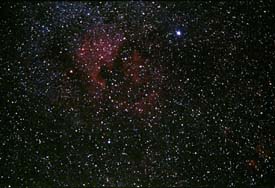
You can also take long exposures by attaching your camera on top of a
telescope
equipped to track the stars. The camera is using its own lenses
and is just piggy
backing a ride on the telescope. The more magnification that is
used, the greater the
need for accuracy in tracking. This 10 minute exposure of the North
American Nebula
in Cygnus was taken while riding on top of a C-8 telescope. The
lens was a telephoto
zoom lens set at 200mm at F 4.5 on Fuji 800 film.
Taking
pictures through a telescope starts to enter the world of the advanced
astrophotographer. Long, high powered exposures need precise
tracking and guiding,
and usually quite a bit of time is invested in getting one good
shot.
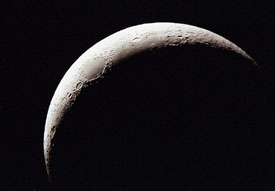
However, some good pictures of the moon and sun are
possible using a simple
method with any type of telescope. Focus the telescope first, then
move your tripod
and camera up to the eyepiece of the telescope and focus the camera
lens and shoot.
Be sure to get the camera as close and squarely to the telescope
eyepiece as possible.
Use a 50mm lens on the camera and let the telescope do all the
magnification. Never
attempt to photograph the sun without using proper filters!
This auto exposed shot was taken on Kodak 400 with the telescope at 50
power.
Once
you have taken some night photos, the next thing to do is have them
developed. We have taken film to the local
grocery store for over night processing and have gotten some very
good results. And we have gotten some that were
not so good.
Most places offering overnight service ship the
film to large photo labs for developing. This is good in one sense
because these labs have modern equipment and change their chemicals
often. But all film is treated the same and your
night shots will be developed and printed the same way as any other
film. Occasionally negatives may be cut in the wrong
places because they are not familiar with night shots, and can't
locate the edge of the frame. Or prints may look washed out,
or faded, because they are printed at the same levels as average
daylight photos.
The best thing to do is call some of your local
photo developers and ask them if they are familiar with developing and
printing night photos. Letting them know what you have before
developing and printing will give you much better results.
Local photo processors will often put a little extra effort into
your photos, because your doing something they don't see
everyday. Some simple adjustment of brightness and contrast can
greatly enhance night photos.
Having photos custom printed, and adjusted in the
darkroom by someone familiar with night photography, is always the
best way you can go. Custom printing is an art, and is time
consuming, so expect to pay a good deal extra for it.
In recent years, another option has become
available. You can have your negatives scanned onto a CD and view
them
on your computer. Computers and photo editing software have given
us the ability to have our own digital darkrooms.
There is no limit to what you can do to a photo on a computer. Deleting
dust and scratches is a snap and you can make
adjustments to the brightness, contrast, and colors. But be careful
not to go to far. It is easy to make your photo look
unnatural and overdone. You can save any changes you make and print
them yourself, or copy them back to disc and
take them back to a photo store for printing.